Sunday, June 23, 2013

How do you store your Project Life Supplies??

I think being organised is the key part is actually completing some of my craft projects and especially keeping up to date with my Project Life. 

Over the past few months I have been buying more and more products that are suitable to put into my albums but I am finding that every time I go into my Craft Room to actually sit down to get a few weeks completed, I find that I spend more time looking for things that I know I have ... somewhere!!

So over the past few months I have been looking for suitable items to store, display and organise my goodies, below I thought I would share with you what seems to be working for me currently!


 This fantastic tray I brought a few months ago from the Silva Spoon after I saw a picture that Lisa posted. It was a little more that what I wanted to pay but was the perfect size and style for what I was looking for to house my 3x4 Cards in!


 I found this shadow box a few months ago from Earthborn. It has a glass lid on it but certainly great for housing all my wood veneers and bit and pieces!


 mmmm Flair Buttons... can say that I am addicted!! 
I love Flair Buttons, these just add the final touch to a card or project! 
I found this glass jar at Earthborn (it was on sale!) thought it was perfect. 
I love that I can see them all. I still have to upend the jar to find the right one, but that's the fun! 


 All my Alphabet Stickers are now housed in this Timber Crate from Typo.


 These adorable stands for my washi tape are from Chibi Run .
 Love them but I need to get more!


I've sorted my tags and labels into colour groups, so hopefully they will be easier to look through when doing my pages! 
 These cute little ceramic bowls from Kmart - $4.00 for 3

Thanks... Jules xx

Tuesday, April 16, 2013

Project Life Week 7

Week 7 is finished.. 

Valentine's Day fell within this week, unfortunately I had to work till 7 so no fancy dinners, but I did come home to a beautiful colourful bunch of Gerbaras (which I love)


    I have been waiting to get these photos printed from our 4 x 4 Day Trip that we went on a few   weeks ago!

 I think because of all the rain that we had Anthony was getting sick of being at home so we had originally planned to go over the The North Shore and then up the beach to Rainbow but as soon as we got out onto the highway it bucketed down with rain!

We continued up to the Rangers Office at Tewantin to the barge but were advised that with all the rain that we had over the past few weeks, there were alot of exposed rocks on the beach and probably should not take this route! 


So instead Anthony decided to go inland... we ended up at Imbil State Forest. 
There were lots of roads closed from all the earlier flooding in the area but we still managed to find our way through. We drove to the top of this point that he was looking for to check out the views - pity that there was alot of low cloud and the day was overcast but on a clear day the views would be stunning! We were up towards Gympie but you can see all the mountains on the coast as far as Mount Coolum (and I think further)


Anthony wanted to see 

  • Waterfalls 
  • Mud
  • Dirt Roads
  • Steep Hills
  • Views
  • Walking Tracks

Well he wasn't disappointed!

We went for a walk up to the cascades - pretty slippery but worth the walk! Great day!


I brought Photoshop Elements 10 (which was on sale for $70) hoping that I will be able to teach myself to use it ! (fingers crossed)


Thanks...Jules xx

Saturday, April 06, 2013

March Tag Swap - OMG it's Thursday

 My original design for my Tag Swap! 
(I always make up a dummy tag when taking part in these challenges)

This month's challenge for our Tag Swap was Days of the Week.
Again, randomly chosen for us, I ended up with Thursday.

I recently purchased some of these stamps called Funny Bones by Riley & Company - 
I just love them, simple and they can be used for anything really!

The one I choose to use is called Pointing Midge.

Putting these Tags together was quite easy - 
I used some Red 3x4 cards (I think these were from the BH Cardstock Packs Clementine Kit)
3x4 White Cards again BH Cardstock Packs - just trimmed down slightly to leave a nice red border.

Corners rounded with my WRMK Chomper (yellow handle)

All the stamps I used were inked with Ranger Archival Ink - Jet Black
Pointing Midge
OMG - from a stamp set from Give A Girl A Blog
Thursday - from Technique Tuesday (Stamp Set I have had for years)

Red and White Gingham Washi Tape down the left hand side and finished off with some Red Bling.

 From the sample above you will notice the the speech bubble is oval but in my final ones I have used a different shape. Originally the thought of having to cut out 14 of these speech bubbles was not impressing me! 
I have been looking for a Speech Bubble die or punch for a while but the ones I have seen were either too big or too small, but when I was at the Stitches and Craft Show I found a Sizzix Die set called Retro Camera and Icons and it actually comes with 2 different size speech bubbles plus extra dies - one very happy lady - quickly ran these through my trusty Cuttlebug Machine, inked the edges with some Red ink and then added some foam tape behind them to make it stand off the page! 

I was really happy with how they turned out! Simple and clean (I think!)
I hope the ladies in Group One like them!


Thanks...Jules xx

Thursday, March 07, 2013

Project Life Update - Weeks 4 - 6

Well the sun has finally come out so I have been able to get some decent photos of my Project Life Pages that I completed last week!
Slowly but surely getting there in keeping up todate! 

Week 4
 Not a good week!
Attended a funeral of a good friend who's husband was tragically killed in a car accident - very sad and very hard to attend!
 Cyclone Oswald's effects of hitting the South East -
Flooding and crazy amount of rain that fell here on the coast in the past 2-3 days!
 Photos from off FaceBook and the Internet of the flooding areound the area!

Week 5
 The aftermarth of the Flooding and tidying up!
 A night away at the Gold Coast.

Week 6
Loving adding my 6x6 Instagram Photos to my Project Life Album.
Lots of Happy Mail arrived for me this week!

Hope youare keeping up to date with your Project Life??

Thanks...Jules x

Tuesday, February 26, 2013

"EGGCITE"

My current Tag Challenge Swap is finally done! 
And it wasn't easy, I really struggled this month!


We had to choose a word - my word was "Celebrate".
I had already picked my stamp set that I wanted to use and had some ideas, then Petrice decided that she would put all our names and into Random Org and we would then get a new word! 
Bummer, all my plans quickly went out the window!!

My new word was "Excite" (not overly excited about that!)
 I looked through all my stamps (and there are quite a few) and not one has the word excite or excited on any of them!
So for the past few weeks nothing was coming together and nothing was jumping out at me to use Excite on a Tag.
Then I had a brainwave and thought maybe I could change my word slightly and do a play on the word and change it to "Eggcite" since Easter is not far away either!
 Long story short, I messaged Petrice and she didn't see a problem with it (as it is all a bit of fun!)

So below are my Tag Swaps.
 
I'm really happy with how they turned out. Very simple and clean!
 I love the colours together with just a hint of aqua on the flowers and the cute little chickens on the paper pull it all together nicely!
I also had these cute little Easter Egg Embellishemnts that I got from Spotlight (mixed colours) but the aqua matched perfectly with the papers and colours I had choosen!
 
I have stamped "Eggcite" onto some washi tape in Stazon ink but my thinking when doing this was incase if the ladies who receive my Tag in the Swap, don't want to keep  "Eggcite" on the Tag, they can actually remove it to add extra journalling and it won't damage the tag or look like something has been removed!
 
 Well, they are being posted today as cut off is the 1st March. 
Hopefully the other ladies like them and can use them somewhere in their Project Life Pages!

Thanks...Jules x


Wednesday, February 20, 2013

Project Life 2013


 Well I have finally started my Project Life 2013!

 To be honest I have been slowly added photos here and there and trying to get up to date but needed to go back and fill the gaps with journalling and embellishments.

The hardest thing I have found to do was the title page..
I really struggled with this as most people have a Family name that they can add but we aren't married so we have two names and I didn't want to have them on there.

A few weeks ago I cam accross Michelle Wooderson's Project Life Cover Page and I loved what she did - very clean and simple! I loved how she just added their names, age and a bit about them!

Title Page for 2013!


Week One:

Busy week here for us, just back from holidays and not due back to work for another few days so trying to fit as much in a possible!


My older sister went overseas for holidays so I asked her to send me some Post Cards from the different places they went. 
The Post Cards arrived after they got home but still nice to receive these in the mail and add to my album!

I still have a photo to add on this week as the one I had originally printed I gave away, so I need to reprint this and add (hence the blank green gap)

Week Two
Back to work and back to reality this week!
Busy weekend with lots going on Friday, Saturday and Sunday.


Week Three 
lots of small things happening!


If it ever stops raining, then I will be able to photograph a few more weeks! 
Slowly bet surely I am getting caught up!

Thanks ... Jules x


Tuesday, February 19, 2013

How do you store your stamps??

I have been a stamper for many years now and with most companies changing from Wood Mounted Stamps to Acrylic or Rubber stamps, it means that the cost have come down, which means you can buy twice as many stamps now, right???

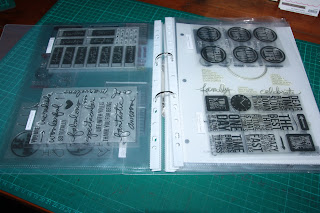
All my other stamps are stored in folders per company and then onto sheets of acertate and then in thicker sleeves. I also stamp a copy of the image onto paper in ink so you can see clearly what the image looks like! I have been storing my stamps this way for about a year now, as it is so much easlier to see what I have when I am searching for the right image to use on a card or project!


With my Project Life Album, I still love to use stamps throughout but have noticed that I seem to be buying more word and quote style of stamps.
So with that being said, with my ever growing acrylic stamp collection of late, I have been getting frustrated with not remembering which stamps I already owned as I was trying to keep them in the original packaging and with my Project Life products.
 
Long story short, why not store these word stamps like my images???
 

 My new Ali Edwards Stamps by Technique Tuesday


Now they are all in a nice folder altogether!
 
I can just grab out my folder and flick through until I find the stamp I am looking for, ink up, stamp, clean and put back in the same spot! Easy peazy!

Great minds must think alike as Kellie from Give A Girl A Blog has a post over on her blog today about the same topic!!
 
Well it is pouring rain here AGAIN on the Sunshine Coast and not great weather to to anything except stay inside and watch tv/dvd's or craft...
 
I'm hoping to get caught up on my Project Life for 2013... lets hope that happens!
Hopefully I will be back later with some of my January and February 2013 Project Life!
 
Thanks... Jules x

LinkWithin

Related Posts with Thumbnails