Tuesday, November 30, 2010

Christmas Bon Bon's and Boxes Advanced Class


You are invited to spend a day of fun and creativity with like minded people, whilst using gorgeous papers from Basic Grey's Jovial Collection.

Sunday 5th December 2010
from 10am
Cost is $35.00 per person

Cost includes materials to make these stunning projects which include a Christmas Bon Bon and 3 Boxes.

In this Advanced Class you will learn some great new techniques and each person will get a photographed instruction sheet to take home so they can reproduce these boxes for many other occasions.

There is quite a bit of measuring and scoring in this class, but is suitable for Beginners right through to the Experienced Crafter.

Each customer is required to provide their own Basic Tool Kit which should include: strong double sided tape, glues, pencil, rubber, ruler (with inch measurements), paper trimmer, craft knife, bone folder, foam dots.
If you have a Score Pal or Scoring Blade for your Paper Trimmer, please bring that.

Seats are Limited so bookings are essential.

Thanks...Jules

Sunday, November 28, 2010

New Stamps in store...

This week I received another range of new stamps in store from Cats Life Press Stamps
I have had a few of these stamps for about 5 or 6 years now and I use my Handmade Card Stamp almost every day.
So many people commented on these stamps so now they are available in store. Again, something a bit different to everyone else!!
Already some have sold out, (gee, gotta be quick!) but don't worry I will be getting more in and also I have a hardcopy of their Catalogue, so you are more than welcome to browse this and order what you want!!

Anyway, below are the stamps that are now in store (minus the ones already sold). Mainly word or sentiment stamps as these are becoming very hard to come across, especially simple or straight to the point! Plus I love all the Seal Stamps.

I will be back with some samples of Gift Tags I have made with these Seal Stamps that have been selling really well in store (probably why the stamps sold out in the first 2 days!)


Have a great Sunday... Thanks...

Sunday, November 21, 2010

72 & Sunny Creative Card Kit Samples

These are my samples from November's Creative Card Kit.
Not my usual colours and style of papers and embellishments and I have to admit that I did struggle to get my samples done. It has been ages since I have used stickers on my cards, but these were fun and are suited to kids cards or even scrapbook layouts!


Thanks...

Saturday, November 20, 2010

Free Standing Pop Up Cards

found this tutorial for the Free Stand Pop Up Card ages ago on Splitcoast Stamps by Mary Jo Albright and have used it over and over. It really is quite simple to make.

A different style of Christmas Card that I have been making this year is the Free Standing Pop Up Card.
We made similar style cards (not Christmas) months ago in a Creative Card Class and I said back then I thought they would be great as a Christmas Card as they could sit on the shelf rather than a traditional style card plus they have a WOW Factor when you first open them!
Anyway, the ones below I have used stamps from Wild Rose Studio.
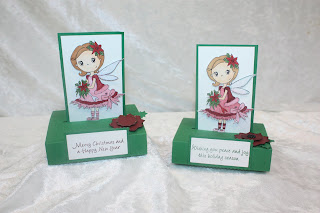
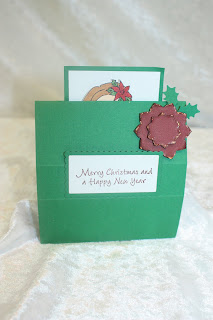
Cards from Photo 1:
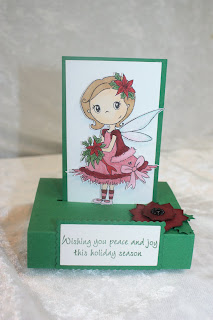
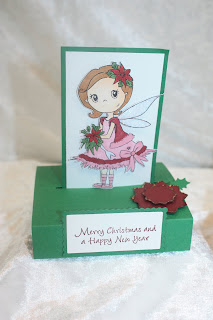
I have used stamps from Wild Rose Studio's latest release: Fairies. She is called Ella with Flowers, and she seemed very Christmassy.
I've stamped my images onto X-Press It Copic Cardstock and then cut then out and the base of the Pop Up card is white cardstock. I have coloured Ella with Copic Markers: E50,E21,E31,E33,E35, R39, R59, R81,R83,R85,YG63 and YG67.
I don't know if you have realized, with the packaging on The Wild Rose Studio Stamps, they have a coloured image that your Acrylic Stamp adheres to, so what I always try to do is when I first get a new stamp, I coloured it in trying to use similar colours that are on that sheet! Pretty Cool Hey!
I've added Diamond Stickles to her wings and then cut her out and placed foam dots behind her to make her stand out a little. That way so also becomes like the stopper for the card to stay in place.
The flowers I have made using the Blossoms 2 Nestabilities and just inked and lightly distressed the edges. I've used a Pomegranate Textured Cardstock to match her dress, then put some Black Pearls in the centre. I used my Martha Stewart Holly Punch.
The sentiments on the front are Hero Arts Christmas Stamps I've had for years and years, inked in one in Bravo Burgundy and the other in Garden Green Inks from Stampin' Up! Then I used my Long Rectangle Scalloped Nestabitilites.
I've kept both cards fairly similar!
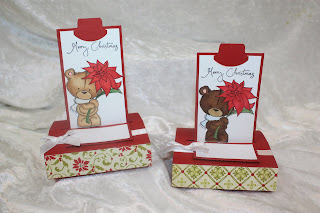
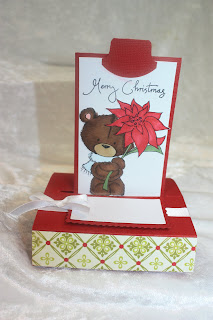
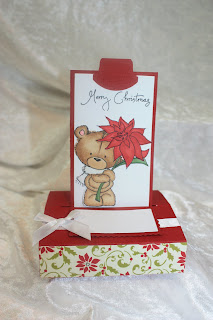


Cards from Photo 2:
I have also used a stamp from Wild Rose Studio, this is a Milton & Co Stamp called Milton with Poinsettia. The teddy bear style of stamp is not my usual style, but Milton is very cute!
I've stamped my images onto X-Press It Copic Cardstock and then cut then out and the base of the Pop Up Card is white cardstock. I have coloured both these images with Copic Markers, but I've had these coloured for months and I have no idea where I wrote down what I have used! Obviously I have used Colours from the E colour family. I've coloured them both differently, one is light and the other is a darker shading. Both Poinsettia's have been coloured the same using YG63, YG67, RV29 and R29 (I think).
The base of the Pop Up card is made from Crimson Textured Cardstock and the pattern papers are from The Girls Paperie Tinsel & Twig Collection.
I've placed some white Satin ribbon on each card, with a little bow then I have made a small plaque so you are able to write a personal message on the bottom of each, and this is made by running it through my Cuttlebug with my Long Rectangle Nestabilities.
The sentiment on the top is from a set called Christmas Greetings again from Wild Rose Studio.


Below is what the card looks like when it is folded down, and these cards will fit into a standard C6 envelope!


Thanks...

Wednesday, November 17, 2010

The Greeting Farm Christmas Card


A while back I received in store the set Xmas Sweeties from The Greeting Farm. They are so cute!
I coloured them in with my Copic Markers and then to do the white fluffy bits on their hoods and jackets I used some Puff Paint that I've had for ages. You put this on the area required, leave it sit over night then hit it with your heat gun and it puffs, pretty amazing stuff. I've also used it in the past to put froth on beer mugs!

So today I was able to get a few unfinished projects finished and this was one that was on my list.
I just made this base of a card like a acordian card, (sorry had a mental blank of the actual name of the style of card) then placed the stamped images into the different sections. At the back I've added a stamped Christmas Tree from a older Papertrey Ink Stamp set from a few years ago (one of my favourite Christmas Stamps)added a sentiment.

Thanks...

Creations in Paper Copic Class 5

Creations In Paper Copic Class 5 we are going to learn how to Colour with Grays to make Black and Shading of your White Images.

When colouring with your Copic Markers we use Markers from the C and W colour families to replicate Black. Do not use your Black Copic Marker to colour your entire image.
We tend to use grey markers to allow for shading and high lighting. If you were to just use the Black Copic Marker, your image will be flat with no definition!

Cost is $50.00 per person
This cost includes 6 Copic Markers and photographed Information sheets and Practise Pages of stamped images.

Please bring along any Copic Markers you may already have, as the markers included in the Class cost are C9, C7, C5, C3, C1 and BG10.
If you already have these colours, I am more than happy to swap these on the day of your class for other colours.

Dates and Times:
Thursday 2nd December from 10- 12
Saturday 4th December from 2 – 4
Thursday 9th December from 10– 12
Saturday 18th December from 2– 4

Payment is required at time of booking to secure your seat.
Markers need to be ordered in advance.
If you wish to attend, please go to the Pay Pal button below to register and choose the date that suits you or if the dates above don't suit but you wish at attend this class, please contact me in store to see if we can arrange alternative dates and time.


Copic Class 5


Monday, November 08, 2010

Wedding Cards

Here are a few more Wedding cards I finished making last week using the Bride and Groom from Wild Rose Studio.
I've used the same layering technique for all the brides dresses, I just changed the colours of the metallic papers. Both the Bride and Groom are all coloured with Copics Markers and some Spica Pens also for that extra bling!!


Thanks...

LinkWithin

Related Posts with Thumbnails