Friday, November 20, 2009

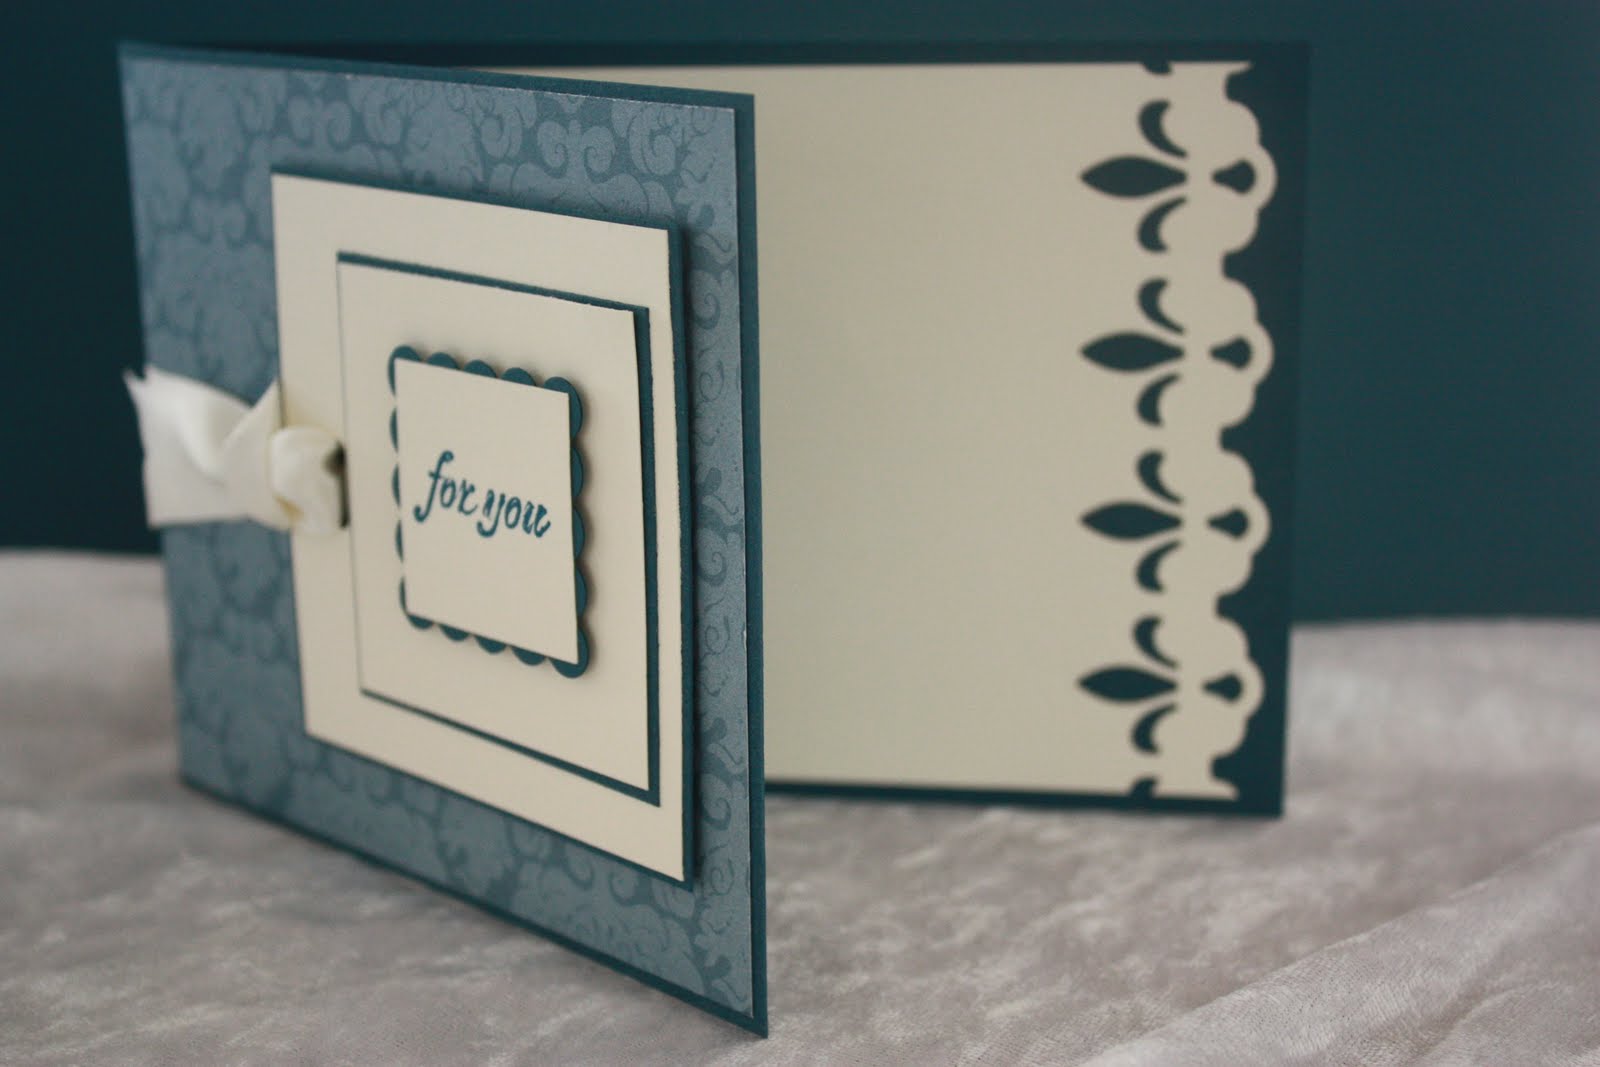
Card 4 from Bella Bleu

Well here is the final card in the set I made using Bella Bleu Designer Series Papers.
This card is a little different to my standard cards that I make, and this will fit into a SU C6 Medium envelope.


Supplies Used:
Stamp Sets: Fresh Cuts
Cardstock: Not Quite Navy, Very Vanilla
Designer Series Paper: Bella Bleu
Inks: Note Quite Navy
Punches: Scallop Square, Horizontal Slot
Other: Cuttlebug, Borderbilities, Wide Satin Ivory Ribbon

Thanks..Jules

Thursday, November 19, 2009

Card 3 from Bella Bleu

Ok, so for card 3 from this set.This would have to be my least favourite of the 4.
I think it is a little too busy. I don't like the row of Pearls on it, but when I tried to remove them it tore the paper a little, so they had to stay, so if you can picture this card without the row of Pearls!!


Supplies Used:
Stamp Sets: Fresh Cuts
Cardstock: Kraft, Not Quite Navy
Designer Series Paper: Bella Bleu
Inks: Not Quite Navy
Punches: Scallop Oval, Large Oval,1/2 inch Circle
Accessories: Taffeta Ribbon-Kraft,Build A Brad Pewter
Other: Cuttlebug, Borderbilities, Pearls

Thanks..Jules

Wednesday, November 18, 2009

Card 2 using Bella Bleu

Another card I made using the Designer Series Paper Bella Bleu. There are 4 cards in total that I made in this set, so I might actually make up a nice gift box and give them as a gift!
This is quite a simple card, I just love patterns on the paper they have such a elegant feel to them and the colours all go perfectly together.


Supplies Used:
Stamp Sets: Fresh Cuts
Cardstock: Kraft, Very Vanilla and Not Quite Navy
Designer Series Paper: Bella Bleu
Inks: Not Quite Navy
Punches: Scallop Square, 1 1/4" Square and Eyelet Border
Accessories: Taffeta Ribbon-Kraft

Thanks..Jules

Tuesday, November 17, 2009

Bella Bleu

Now I must admit when I first saw the Bella Bleu Designer Series Paper in the current Catalogue,it wasn't one that I knew I had to get straight away. I recently purchased a pack and when I laid it out with the co ordinating cardstock and ribbon I was actually suprised at how much I liked it!

So, I've been playing with this DS pack and over the next few days I will post all of them here so you can have a look and let me know what you think! They aren't my usual style but sometimes you need to break away and do something a little different!


Supplies Used:
Stamp Sets:Sense of Time (Spring Mini Catalogue)
Cardstock:Note Quite Navy, Very Vanilla
Designer Series Paper:Bella Bleu
Inks:Not Quite Navy
Other: Cuttlebug, Nestabilities and Wide Satin Ribbon

Thanks..Jules

Monday, November 16, 2009

Christmas Gift Tag Accordian Book


The original idea for this Christmas Gift Tag Accordian Book was from
K.Werner Design
When I saw it I thought it was a great idea. I also made mine in a Christmas theme but you could very well change it and fill it with Gift Tags for all different occasions eg; Birthday Tags.
You can keep it quite simple by reducing the amount of stamp sets that you use also.

Supplies Used:
Stamp Sets: Holiday Line Up Stamp Set,Spotlight on Christmas,Snow Swirled,Christmas Classics
Cardstock: Baja Breeze Textured Cardstock, Whisper White Textured Cardstock
Chocolate Chip Cardstock, Real Red Cardstock, Old Olive Cardstock
Pattern Papers:Ski Slope Designer Series Paper
Inks:Stazon Black and White,Old Olive, Read Red
Punches:3/4" circle punch,
Other Accessories:Real Red 5/8" Grosgrain Ribbon,Stampin Write Markers:Basic Black,Real Red, Old Olive, Chocolate Chip and uni-ball Signo White gel pen, Earth Elements Water Colour Crayons, Aqua Painter
Other:Cuttlebug,Assorted Nestibilities and Twine

Thanks..Jules

Friday, November 06, 2009

Inexpensive Gifts


I love giving gifts to friends, work colleuges and neighbours for Christmas. Every year a few weeks prior to Christmas I try and spend a few days in the kitchen making yummy homemade treats like Rum balls, Apricot balls, (my extra special) Rocky Road, Shortbread, etc and then packaging them up in celo bags and giving each person a small basket full of yummy Christmas treats. Hopefully this year I will be able to do the same. I know this is not possible for some of us!
I also like to have some gifts on hand incase I have forgotten someone or we need to give any last minute gifts to friends who call in.

I have been starting to buy a few inexpensive (pre packaged) food itmes from places like Big W, Woolies and Coles in which I have taken the original boring labels off (or decorated directly over the top) and decorated them with some gorgeous Designer Series Papers and embellishments from Stampin' Up!

Most of these food items were under $10.00, so these could be great gift ideas for neighbours. I love items in tins and bottles as these are easy to decorate.
The items in the photo above are Tinned Biscuits, Jars of Hardboiled Lollies, a bottle of Fruit and Nut Chocolates and a block of Cadbury Chocolate (with the purple packaging removed and then covered the alfoil block). I have also decorated a plain white gift bag with some patterned papar and ribbon to give the gifts in, and again they are more likely to reuse the gift bag, then rip off the wrapping paper!

I have used the Ski Slope Designer Series Papers (112994 416.95) the Tree Trimmings stamp set (116893 $24.95). I love the 1 1/4 inch Candy Cane Striped Grosgrain Ribbon (113099 $19.95)which are all from the Spring Mini (available until 30/11/09).

Next time your shopping, have a look at the supermarket for some ideas, I'm sure there is something that will catch your eye!

Thanks..Jules

Monday, November 02, 2009

Christmas Card Workshop


Here are some cards that I made for a Christmas Card Workshop which was held last weekend.
Everyone got to make a Treat Box, Notebook Holder and 6 Christmas Cards. Everyone used the Ski Slope Designer Series Paper and Tree Trimmings Stamp Set from the current Spring Mini Catalogue.
I love the bright colours in the Ski Slope DS Paper, and that Stampin' Up! have broken away from the "Traditional Red and Green" Christmas colours. (112994 $16.95)
The Tree Trimmings stamp set is so versitile, not only use it for Cards, but it's great to use for making your Christmas Tags, add a few diffent shapes, colours and layers with Stampin' Dimensionals and tadah! "stunning". (116893 $24.95)

** which reminds me, the Mini Spring Catalogue finishes at the end of November, so if you still haven't purchased your favourite Products, then time is running out! Don't forget that some of these sets and items may not be available again, so don't miss out!)

Thanks..Jules

THE PAMPERED STAMPER

It's been ages since I have posted anything on my Blog. I have been flat out doing other things which have been keeping me away from updating and posting! I have done some cardmaking lately, but unfortunately it has been NON Stampin' Up! related things so I haven't posted them as I try and keep my Blog just for my Stampin' Up! Projects and samples. October was a blur for me, with somthing happening every weekend, from Workshops, Cancer Awareness Fundraising Day, Christenings, etc.

The Pampered Stamper is an idea Tina and I have been busy with trying to get up and running, and finally we are able to offer this to our Friends, Customers and Family. This is available to anyone on the Sunshine Coast, (locals or visiting), just contact either Tina or Myself. (There is a link to The Natural Beauty Retreat on my sidebar)

THE PAMPERED STAMPER

Ladies,
You are invited to spend a day of fun, creativity and total selfishness pampering with friends …

Saturday 21st November OR Saturday 5th December 10am – 4 pm

@ The Natural Beauty Retreat:106 Thrushs Road, Dulong

Scrumptious Morning, Afternoon Tea and Lunch is provided

Enjoy and relax whilst sitting on the deck looking out over the beautiful hinterland on the Sunshine Coast, in a Peaceful and Tranquil setting.

Cost for the day is $110.00 per person

The Day Includes:
1 Hour of much needed Pampering:
Your choice of either

• Full Body Massage
• Rose Quartz Facial
• Manicure
• Pedicure
Using Ajala Natural Beauty products, which are manufactured through The Natural Beauty Retreat, using ingredients that are all natural and organic.

AND

Exclusive Card Making Class:
Includes materials to make a beautiful handmade box with 8 matching cards and envelopes whilst using gorgeous products from Stampin’ Up!

Learn some great new techniques. The day is suitable for Beginners right through to the experienced Paper Crafter.

To keep the day’s as relaxing and enjoyable as possible; there will be no more than 10 guests on each day. Call today to book as seats are limited.

Below are the Projects in which you will be making with Julie.

Each person will make this beautiful Handmade Gift Box which you can reproduce and send to Family and Friends.
Also included are 8 beautiful Handmade Christmas Cards with Envelopes, in coordinating colours.


**as kits need to be made up in advance we ask that you please respond by the due dates listed below**

RSVP: Monday 16th November for the Retreat on Saturday 21st November And
RSVP: Monday 30th November for the Retreat on Saturday 5th December

Each person is required to bring there own basic tool kit which should include:
Ruler (with inches), Pencil, Rubber, Double Sided Tape or Tabs, Foam Dots, Scissors, Paper Trimmer, Cutting Mat, etc.

If you have any questions about anything above, please contact

Tina on 0438 505 544: The Natural Beauty Retreat
or
Julie on 0419 758 217: Independent Demonstrator Stampin’ Up!


Thanks Jules

Friday, August 21, 2009

Father's Day/Male Cards


I have a workshop coming up and the hostess wants to do some Father's Day/Male Cards, I don't know why, but this is somthing that I really struggle with.
Above are a few cards I have made recently.
I love the new Designer Series Paper, Parisian Breeze from the new Spring Mini,it is such a great pack as it is both feminine and masculine designs, so it works well for both. I just love the co-ordinating colours!

Product for the 3 cards:
Stamp Sets: Loads of Love, Just Beachy, Occasional Greetings
Inks: Chocolate Chip, Baja Breeze, Stazon Black,
Cardstock: Chocolate Chip, Baja Breeze, Whisper White, Kraft Cardstock, Watercolour Paper
DS Paper: Parisian Breeze Speciality Designer Series Paper
Other:Chocolate Chip Grosgrain Ribbon, Button Latte, Linen Thread, Large and Small Oval Punches, Large Star Punch,Curly LAbel Punch Bundle,Daubers

Product for 1 Card:
Stamp Sets: Just Beachy
Inks: Chocolate Chip, Baja Breeze, Close to Cocoa
Cardstock: Chocolate Chip, Baja Breeze, Whisper White, Kraft Cardstock
DS Paper: Parisian Breeze Speciality Designer Series Paper
Other:Cuttlebug, Daubers, Square Nestabilities, Scallop Square Nestabilities, Brads- Vintage (SU Retired,Double Ended Tags Nestabilities

Thanks.. Jules

Birthday Cards


Here are a few Birthday cards I made last month for my niece and nephew's birthday's.
The train one was for Kirby. I CASED the idea for this card from the new Spring Mini Catalogue.I think this set Choo Choo is so cute!
The other card was for my niece Courtney, this stamp was from Inkadinkado - Bad or Fattening. This set had nothing to do with birthdays, I just loved the look on the little girls face and hands on the hips, says she has real attutide! The inside of the card just said Happy Birthday! On Courtney's card was my very first attempt of using Copic Markers, I have purchased a few different colours, so I thought I would have a go at using them and see what I thought. You can clearly see that I need lots more practice!!

Courtney's Card:
Stamp Sets:Inkadinkado - Bad or Fattening, Pure & Simple Alphabet Set (Retired)
Inks: Stazon Black, Momento Tuxedo Black
Cardstock: Tangerine Tango, Whisper White, Pacific Point
DS Papers: Washington Apple
Other: Tangerine Tango Striped Ribbon
Other Other: Cuttlebug, Circle Nestabilities, Scalloped Circle Nestabilities
Copic Markers: Chrome Orange YR04, Ultramarine B29,Light Blue B14,Pink RV11, Skin White E00, Champagne E71, Cocoa Brown E74 and Colourless Blender 0

Kirby's Card:
Stamp Sets: Choo Choo, Right on Track, Pure & Simple Alphabet Set (Retired), Rough Edges Alphabet(Retired), Party Hearty
Inks: Stazon Black, Not Quite Navy, Baja Breeze, Real Red, Kiwi Kiss, Basic Gray
Cardstock: Whisper White, Not Quite Navy
DS Paper: Urban Garden
Other: Baja Breeze Striped Ribbon

Thanks Jules...

Saturday, August 08, 2009

Styrofoam Balls + Glitter = Cupcake Day


But, do we really need a special day to eat Cupcakes?? I think not, but it is for a really good cause!! I don't know if many people are aware that Monday the 17th August is Cupcake Day!
Here in Australia, Cupcake Day is run to help raise money for the RSPCA-Royal Society for the Prevention of Cruelty to Animals (RSPCA is a non-government, community-based charity dedicated to protecting the welfare of all animals - great and small).Here is the link with more detials about the day if you want to get involved Cupcake Day

I saw in a scrapbooking magazine an ad from Doodlebug Designs, and they had made some cupcakes with paper product and glitter (not really sure what they used) but I thought maybe if I covered some styrofoam balls in glue and then rolled in glitter, popped them into a patty case, then maybe they might look like cupcakes. Now believe me this was a pretty messy process!! Oh, and I didn't just do Cupcakes, I also did Sundaes and Icecreams. And the cake I made a few posts ago, well that was made because of the Cupcake Day, that also is in the window. The only thing I didn't have was the cherries to go onto top, I couldn't find anything small enough and then I ran out of time, but they still look good enough to eat!!
Anyway the photos above show you the Before and After, so I was pretty happy with the end product!!

Most people who know me, know that I am a huge fan of anything to do with cupcakes! I have books, aprons, cake stands, etc. This all started last year when I decided to make cupcakes for my Mum's 60th, so I was trying out recipes to come up with the perfect one and then I was making frostings, in all different colours, flavours, etc.
I work partime in a scrapbooking shop, so we are doing our bit to help out on Cupcake Day. We are running classes during the month of August which include Cupcakes and Animals and at every class we are selling Cupcakes for morning tea and supper and all money raised over the period will be going to the RSPCA.
So to get totally involved and let everyone know what we are doing, we decided we needed to go the whole hog and fully deck out the front window with a really cool display! I'm really happy with the end product. Everyone who comes into the store stops and looks at the window display and we have had heaps of comments about it!

Sorry the photo isn't all that great, but I kept getting too much reflection!

(if you click on the photo you will be able to see it in more detail)

Thanks Jules

Sunday, July 26, 2009

Christmas in July


Today, Gaye, Chrissy and myself (fellow Stampin' Up! Demonstrators) held our Christmas in July Card Making Extravaganza.
Everyone got to make 8 Beautiful Christmas Cards and 2 Gift Boxes using the "I Wish" Simply Scrappin Kit and the Snow Swirled Stamp Set.
I did manage to take a few photos at the beginning, but as usual I forgot and got too busy to take photos during the day!!
It was a great day with lots of fun and new techniques learnt by many!
Thanks Jules

Sunday, July 12, 2009

Cake anyone??


A slice of cake anyone??
I know the cake slice box has been doing the rounds on different Blogs now for a while, but I have been wanting to have a go a making this and since I was a Chef and I do still enjoy making cakes, I thought this would be a fun way to include cooking and paper crafting together!! Better late than Never!!
Anyway last week I was using my Cricut machine, and while I was looking for a shape on one of the cartridges which I have owned for about 4 years (Tags, Bags, Boxes and More) I came across the template for a Cake Box (gee, maybe in future I should actually look at things I already have!)
Now, I have one of the original Cricut machines, which cuts 6x12 inches, so this will only cut the cake box at a fairly small size (I think it is up to 5 1/2 inches) but at work we have the Cricut Expressions machine which will cut to 12 x 12 inches. I placed a sheet of 12x12 Textured White onto the mat and keyed in the Cake Box shape and asked it to Fit to Page, it ended up cutting it out at 9 inches. Although it was quite large, I thought it was a good size.
In no time at all, I had 12 Cake Box templates all cut and ready to be scored. WOW. This is so much faster and easier than having to cut them all out by hand!! I used 12 sheets of white cardstock to get a Full Cake, and I think it took me about 30 minutes to put all 12 boxes together. In the end my cake stand only held 10 slices, as they were quite big slices. How easy would that be if you were wanting to use them as wedding boxes. The Cricut also cuts little slits in it, so if you were to add ribbon, it is easy to thread through.

I cannot for the life of me remember who’s blog or where I saw the Tutorial on how to make these cute flowers which I have placed on each slice. (so if anyone knows, please email me, so I can give them the credit they deserve).They are made using the scalloped circle punch, tweezers and glue.
I started making the flowers out of some old patterned paper (non Stampin' Up!)I had at home, but unfortunately it wasn’t double sided, next time I think I would use double sided paper as it would look better (if you look closely, you can see the yucky writing from the back of the patterned paper on the bottom and sides of some of the flowers). Hopfully the photos are OK and that you can see the detail.
I’m happy with the end product.. it looks yummy enough to eat!

Thanks Jules

No excuses...

I have been so busy lately, that my blog was just one thing that has been neglected!!

I have been designing cards for my weekly card classes at work, that my Stampin' Up! projects have just not been happening! Mind you I have just received my pre order of beautiful products from the new Stampin' Up! Mini Spring Catalogue (available from the 1st of August)but that is still sitting on the floor in the box, I did manage to mount my new Stamp Sets.


The photos above are of a few cards that I made recently.
The Flower Pot Card was a huge hit! Who ever came up with the concept is one very clever person. A very simple design.

Tuesday, June 16, 2009

Favourite Photos From Makita Trip 2009

Recently, Anthony and I went on a holiday overseas. We flew into Singapore and then we went on a cruise. The cruise we were on was Star Cruises - Virgo Star! We did day trips in Singapore, Penang, Phuket and Kuala Lumpa, and then back to Singapore.
We had a great time and met some very lovely people.
Between the both of us, we took over 2500 photo's, (not bad for a weeks effort!!) below I have included a few favourites from our trip, so I think I will be very busy scrapbooking over the next few months!! It's been ages since I have done any scrapbooking, due to making cards, so I really need to come up with a fairly simple album layout and design so I am able to pump through the photos!!(not that I am going to scrap all 2500!) I was thinking of doing seperate albums for the different places that we visited, eg: Singapore Album, Penang Album, etc.


Posted by Picasa


Sunday, May 17, 2009

Introduction To Digital Photography Class


I recently mentioned in an early post that I got a new Digital SLR Camera for my birthday back in March. I havn't really had a chance to take a lot of photos with it as I haven't been anywhere or do much in the past few months as I have been so busy with other things. It is a CANON EOS 450D, it is fantastic, the quality is so much better and I was so much happier with this than my old Digital camera. That was until I went to Convention and was trying to use it in the Main Theatre, I ended up taking over 550 pictures, but I was really disappointed with how they turned out when I downloaded them at home, probably under half were any good!
I really struggled with trying to figure out which settings it should have been on.

When I got my camera, I did look into going and doing a Basic Photography Course with either a Camera shop or photographer, but then I was unsure about attending a course as I didn’t know all the proper lingo and thought I wouldn’t understand what they were talking about, and I didn't want to look like a idiot, so I thought I’d wait.

At the end of this week, Anthony and I are off to Singapore. We are going on a 7 day cruise with the Virgo Star, which cruises up and down the Malacca Straight, we are going for 9 days in total and each day we have the option to do different day trips to Thailand, Malaysia, Singapore and Malacca. It still hasn’t sunk in yet, but as I start to pack and get organised I think things might change!

So with my new camera in mind I’ve been thinking of all the thousands of photos we are going to be taking, and this scared me a little as I was thinking of my bad experience I had at Convention!! I would be really disappointed if I ended up with crappy photos from our cruise. Anyway, during the week I received my monthly newsletter from my local Scrapbooking Shop (Daisy Chain), and there marked for Saturday 16th May was an Introduction to Digital Photography (ohh was this a sign!!) So I rang and spoke to Jenny (the lady who was running this) as my concerns were that it was for general point and shoot Digital Cameras rather than SLR’s, but as I was talking to Jenny, she told me that she had the same camera as mine, and that I would probably benefit from it also. So I decided I would go along.
I had a fantastic day, I learnt so much that I never knew, even general things about digital cameras. There were only 5 of us in the class (all ladies) and Jenny explained and showed us different settings that were on both styles of cameras, I didn’t even know these settings existed on my old point and shoot camera!! Most of us who attended actually had SLR’s which was really good.
We learnt about ISO, Resolutions, White Balance, Aperture and Shutter Speed (this still scares me, but I have a better understanding what it actually means), I had no idea what some of these meant or let alone what they actually did! We learnt how to improve your photographs, plus so much more. (Gee, I almost sound like I know what I'm talking about!!)
I would stronly recommend taking a class to anyone, new or old to using Digital Camera’s! We covered so much, my head was spinning with details when I got home. Anthony wanted to see if I actually learned anything so he suggested that we head down to the beach and take some photos! So off we went, camera in hand (and my notes)
Above are some photos which I took (using my new found information), usually I would have left the settings on auto or landscape!!
I can tell the difference already, hopefully I can remember all this and come back with thousands of GREAT photos of our trip!
Sorry it’s such a long post, but I had so much to say as I learnt so much, and a huge THANK YOU to Jenny.
Thanks for reading…Jules

Saturday, May 09, 2009

Happy Birthday


This was a Birthday Card I made back in April for friends of ours, little boy, Ned. I think he like it, but he was more impressed with what was inside, A Gift Voucher!
This card was inspired by Heather
A few months ago Heather had a online punch class that I took part in and this was one of her designs.

What I used:
Stamps: Basic Phrases
Cardstock: Kraft,Pacific Point, Kiwi Kiss,Old Olive and Close to Cocoa
Accessories: 1 3/4" circle punch, Large Oval,5 Petal Flower,Word Window,Small Oval, 1/4" circle, googley eye

Tuesday, May 05, 2009

Stampin' Up! Convention 2009


Paper Angels is the name of our group and Liz is our Team Leader.
The above photo is of some of the ladies in our group... Loren, Liz(Team Leader) Robyn and me. We had shirts made this year with the PaperAngels logo on them for convention. They turned out really well, and we all looked good in matching shirts! There were 16 in total who attended accross a few groups, so it was easy to find each other. We had quite a few people comment on how good they looked also (I think we may have started something).(click on the first photo to see the logo better)

Convention is so much fun, not only is it a girls weekend, but you get to catch up with old friends, meet new ones, get to stamp and attend informative forums about Stampin' Up! At the end of the 2 days you walk away feeling Inspired, Creative and your head is spinning with thousands of ideas, that you can't wait to get home and put into practice!

The photo below is of most of us who attended in the main Theatre on the first day. Some ladies were missing for this photo!


Thanks...Jules

My Swap...


This was my Swap that I made for our recent Australian Stampin' Up! Convention 2009. I only made 50, but I was happy with that, I did swap them all, but I have to make one more and mail it out to Tamra (see I didn't forget) as I ran out by the time she arrived!
As I mentioned I swapped all mine, so in return I received 50 swaps back, I haven't gotten around to taking a photo of these yet, so when I do I will post a photo of them.
It's great receiving swaps and seeing what other great ideas and designs that people come up with using the same stamp sets. What is also great, I now have 50 cards that I can show my customers and I don't need to purchase all the stamp sets in the catalogue!(yeh right!)

Stamp Set: Fifth Avenue Floral
Cardstock: Kraft, Old Olive, Baja Breeze and Whisper White
Inks: Old Olive, Close to Cocoa, Baja Breeze
Other: Scalloped Edge Punch, Stampin' Dimensionals, Baja Breeze 5/8" Striped Ribbon, Kaiser Craft Bling
Thanks..Jules

Tuesday, April 28, 2009

Swaps are done!!!


Like I mentioned in an eariler post, I have been busy designing and making my Swaps for our upcoming Australian Stampin' Up! Convention. In past years I have made over 100 Swaps, but this year time has just gotten away from me, so I decided to only make 50. I have kept it very simple!

When I get back I will share with you all the Swaps I receive!

Thanks...Jules

Mother's Day Card

This card was designed as a Make and Take for a recent workshop, Mother's Day was originally the theme, but on the night some of the ladies changed it to suit an occassion they had coming up.

Stamp Sets: Fifth Avenue Floral, A Beautiful Thing, Petal Pizzazz
Cardstock: Pink Pirouette, Chocolate Chip, Whisper White
Ink: Pink Pirouette, Chocolate Chip, Kiwi Kiss
Accessories: Scallop Edge Punch, Corner Rounder, Dazzling Diamonds, 2 Way Glue, Pink Pirouette 5/8" Striped Grosgrain Ribbon, Stampin' Dimensionals.
Other: Kaizer Bling (optional)


Thanks...Jules

Busy...

I have been so busy over the last few weeks, I recently started a new job in a new Scrapbooking Store in Noosa, called Gateway 2 Scrappin, I am only working 2 days a week, and I am really enjoying it.

I have had a few workshops that has kept me busy and I also held a Mothers Day Class recently as I wanted to fit this in before I went away, and last of all I have been making my swaps for Stampin' Up! Convention which is on this Friday (1st May).

I'm a bit worried about Convention this year as it is in Canberra and up here in beautiful sunny Queensland the weather has been wonderful! Still in the high 20's, (still in t shirts and shorts) a little cooler at night and in the mornings. I have been watching the news over the last few days and have seen that the weather in Canberra has been cold, wet and they have even started to get snow in the mountains, so you can see where I'm coming from!! Lucky we used to live in Canberra so I still have all my winter clothes, jackets, scarves, gloves, etc so I have been frantically looking through cupboards finding all I can!! I don't cope well in cold weather!!
I fly out on Thursday morning, but I'm looking forward to catching up with my good friend and fellow demonstrator Helen.

Below are a few cards I have made over the past few weeks.

Card 1:
Stamp Sets: Priceless
Cardstock: Chocolate Chip, Riding Hood Red, Pink Pirouette Textured and Plain and Whisper White
Inks: Riding Hood Red, Pink Pirouette
Accessories: Scallop Edge Punch, Scalloped Circle, 1 3/8" Circle Punch
Other:Kaiser Bling

Card 2:
Stamp Set: Petal Pizzazz
Cardstock:Brocade Blue, Chocolate Chip, Tangerine Tango, Whisper White
Designer Series Paper:Patterns Pack II (Level 1 Hostess Gift)
Accessories: Rub-ons-Hand Drawn Bundle (Level 3 Hostess Gift), Vintage Brads, 1 3/4" Circle Punch (non Stampin' Up!)


Thanks Jules

Wednesday, April 15, 2009

Easter Bunny Boxes


For Easter Prestents for the Girls who work in the office with Anthony, I made these cute Easter Bunny Boxes.
They were clear Acetate cubes, that I stamped on the outside of each one with White Stazon ink and I used a old Hero Arts stamp set that I had. I filled each box with Chocolate Easter Eggs, and I also put some of the little yellow chickens throughout the box.
They thought they were great! One of the girls was telling me today, that her husband thought it was the best thing, he ate the original Easter Eggs that were in it, and then he went and brought more so he could refill the box again!!
Thanks...Jules

Catalogue Launch Table Display


On Saturday the 4th of April, I held a Afternoon Tea/Catalogue Launch for the NEW 2009/2010 Stampin' Up! Catalogue. The afternoon went well and I think everyone who attended enjoyed themselves! (gee I hope they did!!)
During the week leading up to the launch, I was busy making cards, scrapbook pages and other projects to show all the ladies attending. Some of the projects were CASED from the New Catalogue and other blogs that I have seen.
I did up a dummy Table Display at home so I had some kind of idea what to do on the day. So the above photo is of some of the projects. On the day I ended up with 2 tressle tables full of dispays and samples. I had planned to take photos of the table display's and Hall set up, but on the day I was a little stressed trying to get everything set up in time before everyone started to arrive, so in the end I didn't get any!(bummer).
Thanks Jules

Wednesday, April 08, 2009

I'm Loving Basic Gray at the Moment..


Stampin' Up! Basic Gray cardstock, ink, ribbon, that it! Not that I don't love Basic Grey (scrapbooking papers)I just don't get enough time to buy that anymore!

Here are a few cards I made recently with Basic Gray products on them.
Card 1:
Wild About You (I probably should have re stamped the elephant as I didn't get a real good coverage with the ink!)
Stamp Set: Wild about You
Cardstock: Basic Gray, Basic Black, Pink Pirouette and Whisper White
Ink: Basic Gray, Stazon Black
Other: Pretty in Pink Taffea Ribbon, Soft Subtles Brads

Card 2:
You are One of a Kind (this was one of the cards I used for a Make and Take last week end for my Catalogue launch)
Stamp Set: One of A Kind
Cardstock: Pink Pirouette, Baja Breeze, Whisper White
Ink: Pink Pirouette, Baja Breeze, Basic Gray
Other: Scalloped Edge Punch, Basic Gray Taffeta Ribbon, Boho Blossom Punch and Kaiser Bling, Stampin Dimensionals, 2 Way Glue.

Thanks Jules

Total Raised for Bushfire Appeal from Stampin' Up!

Hi All
Sorry I am late in posting this, but as most of you were aware, in February after the deversting Bushfires destoryed homes and communities in Victoria, Stampin'Up! offered to donate 50% of sales from certain Stamp Sets. Please see below (which is from the Stampin' Up! website)

Final Donation Amount for the Bushfire Appeal
3 April 2009

In mid-February, we launched the Bushfire Appeal in response to the tragedy that affected so many lives in Victoria and across Australia. We're pleased to announce that with the sales of the Bushfire Appeal sets, our final donation amount to the Australian Red Cross Bushfires 2009 Appeal will be $77,889.63.

We greatly appreciate your efforts to encourage customers to participate in this cause. We also recognise your sacrifice to make this appeal so successful.

Thank you. Your worthwhile accomplishment has truly made a difference.

Thank you to everyone who purchased these Stamp Sets and donated to such a worthy cause.
Thanks Jules

LinkWithin

Related Posts with Thumbnails